So, my dad has gotten this crazy idea to play an in-real-life match of CS:GO in our backyard, being a fan of the game himself just like me.
But where’s the fun in CS:GO with (laser) guns, even a bomb-site A and B, but no bomb?
Having done some Arduino/ESP projects before, I started the task to make a hardware simulation of the bomb in the game. The bomb needed to fulfill a couple of things:
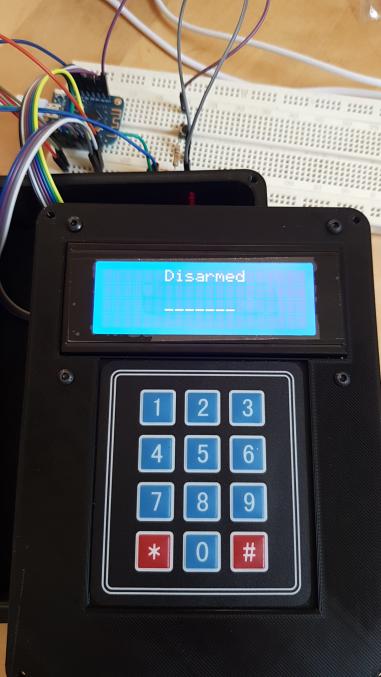
– A keypad to enter the code to “arm” the bomb.
– A (loud) beeper, just like in the game.
– An LCD to show the status of the bomb.
– Has to be able to communicate with a computer, to indicate the status of the bomb (for future things like a large projector screen, or a large audio installation).
– Lastly, of course: fancy lights!
Being all hyped, I ordered the parts we did not have lying around at home from Banggood and waited for it to arrive. As soon as it arrived I started connecting the parts together and writing some software. I got a basic CS:GO bomb simulator up and running pretty quickly!

I got the LCD connected and running pretty soon afterwards. In the mean time I was printing an enclosure for it all with my (well, actually, my dad’s) Creality3D Ender 3 3D-printer. I found a nice model made by NightfuryGamer on Thingiverse: https://www.thingiverse.com/thing:3085333.
This model contains a hole for the same keypad I am using for my bomb. However, it does not have any hole for an LCD display which I of course wanted to use. I haven’t done any real 3D model designing in the past, so I wasn’t looking forward to designing or editing the enclosure.
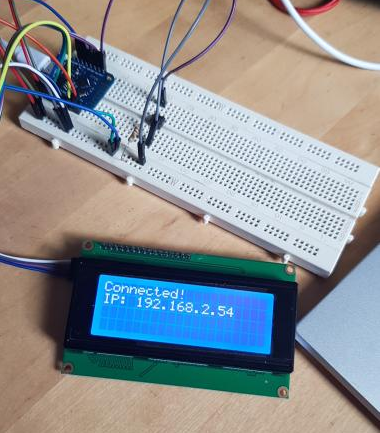
The software I had written for the board (in my case: a D1 mini clone, based on an ESP8266 chip) was far from done, so I put the thought of having to do 3D-designing in the back of my mind. In the mean time, it was time to give this bomb it’s own IP address so it can communicate with my laptop wirelessly!
Shortly after this I found myself having a very unique problem I’d never thought I have. Being a CS:GO player for a long time, you develop a good sense for when the bomb is going to explode in the game, based off of the beeps you hear. See, there is no timer in the game that tells you when exactly it’s going to explode. When trying some basic “algorithms” for the time between beeps, everything just felt a bit off. I tried some basic linear functions, even exponential functions, but nothing worked. I needed to get the exact timing. I couldn’t find anything on Google, so I took the task upon me to find the exact mathematical function for the beeps (can you tell I’m a computer/math nerd yet?). More about this on my other blog post. In short: it involved Audacity, a weird program that fits an exponential curve on a data-set and a lot of time. In the end I managed to get it done!

With the software and hardware part being mostly done now, it was time to start thinking about the enclosure again. Like I mentioned before, I have never really touched 3D modeling before, so I wasn’t looking forward to this part. I have access to a full student version of solidworks, so this is what I was going to use. After half an hour and a ton of struggles, I was finally able to remove some existing features in the model of the top-plate of the existing design. Another half an hour later, I was able to make a hole for the LCD screen. Victory!

Five hours of printing later, it fits perfectly!
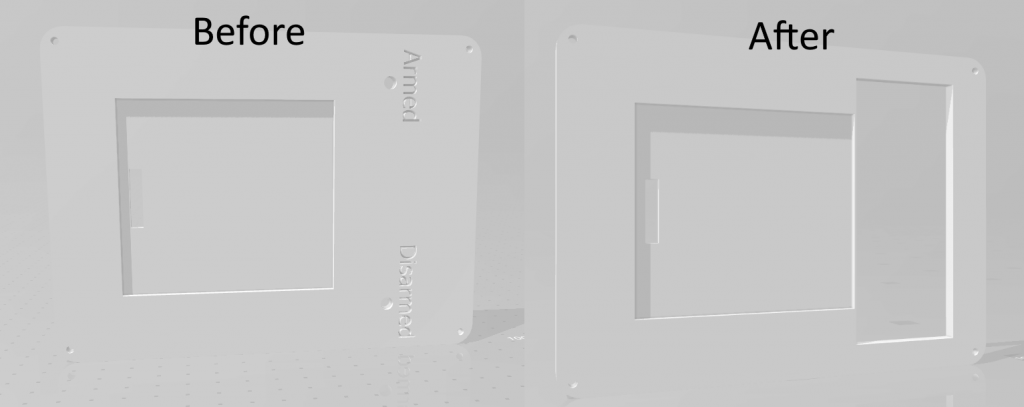
Now it was time for the next task: changing the design of the bottom part of the enclosure to remove all existing holes, and make a few of my own. Mainly:
– A hole for the defuse button.
– An XT60 shaped hole for the XT60 connector (more on this in a bit).
– Two holes for a battery strap.
– A hole for the battery voltage meter.
– A tiny hole for the wires for all the lights and the beeper.
The bomb will be powered by an FPV drone battery. This is because I own one, and I have a couple of batteries for it. This way it’s a bit cheaper because I didn’t have to buy extra batteries. And there’s another bonus: the final product will look bad-ass with a battery mounted on the side and wires coming out of it! One disadvantage of this is that the batteries do not have any protection circuit on them, and LiPo batteries need to be handled with care. This is why I needed to put a battery voltage meter on the design as well.
My plan is to wire the buzzer and all LEDs with the wires visible and sticking out, to make it look more like the CS:GO bomb.
Anddddd… That’s it! This is my progress on this project so far. The new bottom design should be done printing in about 10 hours. When it’s done I can start assembling the bomb in its final form!
The models I designed/remixed can be found on Thingiverse: https://www.thingiverse.com/thing:4543891